Figure 3-2 MMS Sources Dialog Box
| Previous | Contents |
After a context has been created, it must be applied before taking effect. You can apply a context in any of the following ways:
$ DECSET SET CONTEXT TEAM_Z - _$ /DATABASE=DISK2:[PROJECT_EG]PROJECT.DECSET_CONTEXT_DB |
$ DEFINE DECSET$CONTEXT TEAM_Z $ DEFINE DECSET$CONTEXT_DB DISK2:[PROJECT_EG]PROJECT.DECSET_CONTEXT_DB |
Once a context has been applied and a DECset tool activated, it influences the current environment.
This chapter has focused on using the Environment Manager to tailor the development environments for people working on related projects and across teams. However, the Environment Manager is also useful for an individual user for tailoring and switching between contexts, especially when working in environments with varied development requirements.
This chapter describes the description file generator for the Module Management System for OpenVMS (MMS). The MMS description file generator currently supports the following programming languages: BASIC, BLISS, C, C++, CDD/Plus, COBOL, Fortran, Pascal, RDB, and SQL.
You can generate a description file from the MMS command-line (MMS/GENERATE) or from within the DECwindows Motif interface. The general process is as follows:
Detailed information on the description file generator may be found in the following locations:
Description file generation is separate and distinct from application building. They are implemented by very different parts of MMS and are subject to different qualifiers and options.
Generally, anything set using the Options pull-down menu in the main MMS window only affects application builds, and anything set in the MMS Description File Generator dialog box only affects description file generation.
Although, many of the specifications captured in the description file
affect an application build, the steps and qualifiers used in each
process are independent. This distinction carries to the command line,
where the qualifiers on the MMS build command line are separate from
the ones used on the MMS generate command line.
3.2 Basic Description File Generation
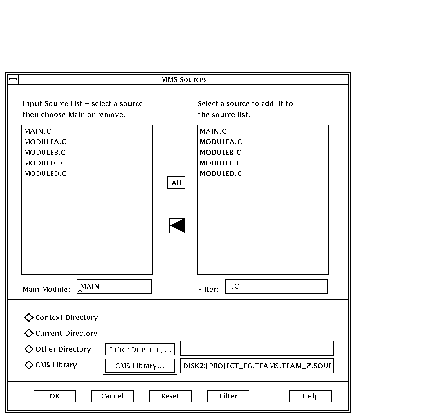
This section shows how a description file can be generated for a C program consisting of a main module (MAIN.C) and some external modules (MODULE*.C) with header files (MODULE*.H). The source files contain interdependencies and references to HP C Run-Time Library functions.
Assuming that all the source files are in the default directory, the MMS/GENERATE command can be used:
$ MMS/GENERATE/OPTIONS_FILE=TOOLS$:C.OPT MAIN.C, MODULEA.C, MODULEB.C, - _$ MODULEC.C, MODULED.C MMS-S-GENBEGIN MMS description file generation started MMS-S-NORMAL MMS description file generation completed |
The description file can also be generated from the DECwindows Motif interface. The remainder of this section shows the DECwindows Motif interface being used on the same set of files; however, this time the files are stored in a CMS library.
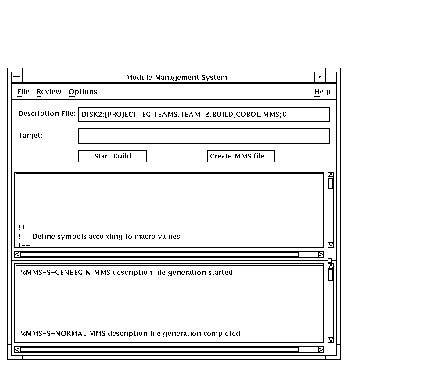
Figure 3-1 MMS Main Window
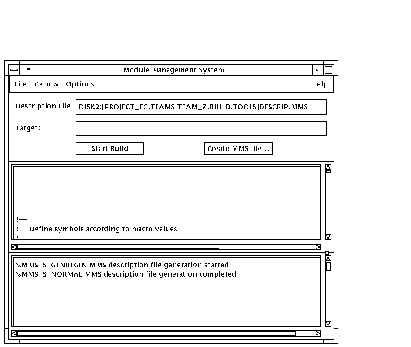
Figure 3-2 MMS Sources Dialog Box
Both the command line and DECwindows Motif interface generate the same description file (see Figure 3-3).
Figure 3-3 Automatically Generated Description File
! Define symbols according to macro values (1) !== .IFDEF DEBUG DBG = /DEBUG DBGOPT = /NOOPTIMIZE/DEBUG .ELSE DBG = /NODEBUG DBGOPT = /OPTIMIZE/NODEBUG .ENDIF .IFDEF LIST : .IFDEF DIAG : .IFDEF PCA : !++ ! List of tools used and required symbols (2) !== ! !C used ! !Executables used !++ ! Missing sources catch-all !== .DEFAULT (3) ! No source found for $(MMS$TARGET_NAME) ! - Attempting to continue !++ ! Complete application - default build item (4) !== COMPLETE_APPLICATION depends_on - MAIN.EXE CONTINUE !++ ! C (5) !== MMS$OLB.OLB(MAIN=MAIN.OBJ) depends_on - MAIN.C - ,MODULEA.H - ,MODULEB.H - ,MODULEC.H - ,MODULED.H - ! $(CC) $(CFLAGS) $(LST) $(DBGOPT) $(DIA) /OBJ=MAIN MAIN.C LIBRARY/REPLACE MMS$OLB.OLB MAIN.OBJ DELETE MAIN.OBJ;* MMS$OLB.OLB(MODULEA=MODULEA.OBJ) depends_on - MODULEA.C - ! $(CC) $(CFLAGS) $(LST) $(DBGOPT) $(DIA) /OBJ=MODULEA MODULEA.C LIBRARY/REPLACE MMS$OLB.OLB MODULEA.OBJ DELETE MODULEA.OBJ;* MMS$OLB.OLB(MODULEB=MODULEB.OBJ) depends_on - : MMS$OLB.OLB(MODULED=MODULED.OBJ) depends_on - : !++ ! Links (6) !== MAIN.EXE depends_on - MMS$OLB.OLB(MAIN=MAIN.OBJ) - ,MMS$OLB.OLB(MODULEA=MODULEA.OBJ) - ,MMS$OLB.OLB(MODULEB=MODULEB.OBJ) - ,MMS$OLB.OLB(MODULEC=MODULEC.OBJ) - ,MMS$OLB.OLB(MODULED=MODULED.OBJ) - ! LINK $(DBG) $(PCAOPT) /EXE=MAIN.EXE MMS$OLB.OLB/LIBRARY/INCLUDE=(MAIN) - ,DISK2:[PROJECT_EG.TEAMS.TEAM_Z.BUILD.TOOLS]C.OPT/OPT- !Link options file ! End of Link !++ ! Files not found. MMS references to these (7) ! files will generate errors. !== !++ !++ ! Objects not found. The following symbols may be undefined. (8) !== !++ ! Create object library if it doesn't already exist (9) !== .FIRST IF F$SEARCH( "MMS$OLB.OLB" ) .EQS. "" - THEN $(LIBR)/CREATE MMS$OLB.OLB !++ ! End of build cleanup work (10) !== .LAST CONTINUE |
All description files that are generated automatically have the same general format, as described below:
Each generated description file may contain a list of files that could not be found and a list of symbols for which no definition can be found. If both missing files and symbols definitionst are listed, check why the generator has been unable to find them. It may be due to a missing logical name or an incorrect definition.
If only missing symbols definitions are listed, the symbols may be
defined in object libraries that were not constructed as part of
current the build. If this is the case, performing a full build will
determine whether the symbol definitions are really missing.
3.3 More Complex Description File Generation
This section illustrates description file generation using more complex
examples. Section 3.3.1 shows a Pascal example where the main source
files are in one directory and the environment files in another.
Section 3.3.2 shows a COBOL example with the source files in CMS and a
requirement to place all the output files into type-related directories.
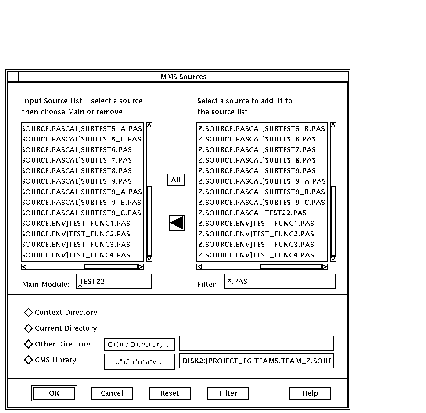
3.3.1 Generating a Description File for Pascal
In this example, the main Pascal source files (TEST22.PAS and SUBTEST*.PAS) reside in DISK2:[PROJECT_EG.TEAMS.TEAM_Z.SOURCE.PASCAL], while the environment files (TEST_FUNC*.PAS) are in DISK2:[PROJECT_EG.TEAMS.TEAM_Z.SOURCE.ENV].
The following steps show how to generate a description file using the DECwindows Motif interface:
$ DEFINE SOURCE$DIR DISK2:[PROJECT_EG.TEAMS.TEAM_Z.BUILD], - _$ DISK2:[PROJECT_EG.TEAMS.TEAM_Z.SOURCE.PASCAL], - _$ DISK2:[PROJECT_EG.TEAMS.TEAM_Z.SOURCE.ENV] $ SET DEFAULT SOURCE$DIR |
$ TYPE TEST_FUNC1.PAS
[ ENVIRONMENT ('ENVDIR:TEST_FUNC1') ]
MODULE TEST_FUNC1;
   :
END.

$ DEFINE ENVDIR DISK$:[DECUS.PASCAL.ENV]
|
Figure 3-4 MMS Sources Dialog Box: Pascal Example
The description file is now ready for use.
3.3.2 Generating a Description File for COBOL
This example is based around the following:
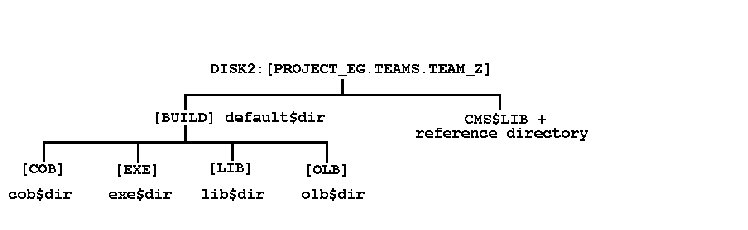
Logical name definitions (which could be defined in an Environment
Manager context) are required for each of the directories.
3.3.2.1 Creating the Description File from the CMS Library
The steps below show how the description file may be generated from the DECwindows Motif interface.
Figure 3-5 MMS Sources Dialog Box: COBOL Example
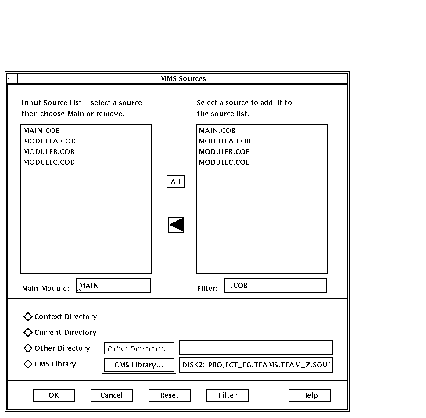
Figure 3-6 MMS Main Window: COBOL Example
The description file may also be generated from the command line using the CMS reference directory:
$ SET DEFAULT $1$DIA3:[PROJECT_EG.TEAMS.TEAM_Z.SOURCE.SRC_REF] $ ! $ MMS/GENERATE/DESCRIPTION=DEFAULT$DIR:COBOL.MMS/OBJECT=OLB$DIR:TEST.OLB - _$ MAIN.COB, MODULEA.COB, MODULEB.COB, MODULEC.COB %MMS-S-GENBEGIN MMS description file generation started %MMS-S-NORMAL MMS description file generation completed |
Regardless of how the description file is generated, you must set the default directory to the sources directory (COB$DIR) before building the application.
Like the generation of the description file, you can build the application using either the DECwindows Motif interface or the command line.
The steps below show how to build the application using the description file generated by following operations in the previous sections:
Figure 3-7 MMS Build Definitions/Directives Options Dialog Box

To build an application from the command line, entering the follow command:
$ MMS/DESCRIPTION=DEFAULT$DIR:COBOL.MMS/CMS |
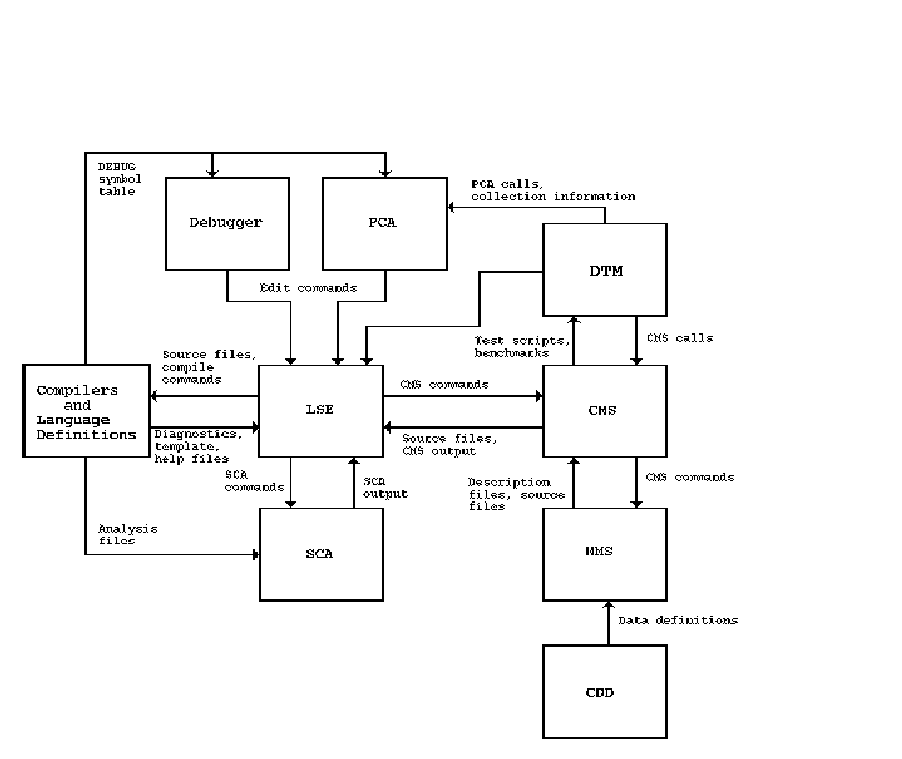
Individually, each DECset tool can significantly increase productivity in specific areas of the OpenVMS application development cycle. However, when used in concert with each other, the DECset tools form an powerful, integrated application development environment with the following characteristics:
This chapter describes the integration that exists between DECset and the OpenVMS application development environment. It provides an overview of the data flow between the OpenVMS language compilers and the DECset tools as well as examples of interaction between the tools themselves.
For additional, detailed information about how the DECset tools work with OpenVMS system services and its language compilers to improve application design and maintenance, see the following manuals:
The OpenVMS language compilers generate a substantial amount of information for the DECset tools, such as symbol table information for PCA, diagnostic information for LSE, and cross-reference and calling-sequence information for SCA.
Figure 4-1 shows the many connections and information flow among the tools that give the OpenVMS programming environment its high level of integration. The boxes represent tools, and the arrows represent information flow, either by means of files or through direct calls between the tools.
Figure 4-1 DECset Tools Integration
The following sections provide examples of how the various DECset tools
interact in an application development environment. Note that an
Environment Manager context (TEST1) was used to tailor all the DECset
tools used in the examples.
4.2.1 CMS
CMS elements may be placed into LSE buffers directly from the DECwindows Motif interface, as follows:
Figure 4-2 CMS: Fetching an Element
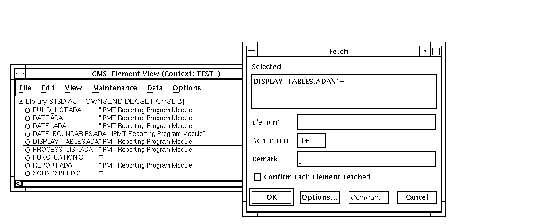
Figure 4-3 CMS & LSE: Element Fetched into an LSE Buffer
This process also works for reserving elements. If an LSE DECwindows session is not active (either expanded or iconified), the element is fetched into the default directory. Once the elements are in the buffer they can be manipulated via LSE commands.
Because CMS can store any file as an element, it is particularly useful
as a central repository, not only for source files of code and
documentation, but also for a variety of files generated by other
DECset tools. CMS can store description files for MMS, test files
(prologue, template, epilogue) for the Digital Test Manager, and
benchmark files. MMS (see Chapter 3) can also access elements in
CMS libraries automatically.
4.2.2 LSE
LSE provides a highly interactive environment for source code development. Within LSE, you can create and edit code, compile and review that code, and correct compile-time errors. You can also invoke LSE from the OpenVMS Debugger to correct source errors.
LSE is integrated with CMS to provide source code management. You can
invoke LSE from the Analyzer portion of PCA and from OpenVMS Mail. LSE
is also integrated with SCA, as described in the following section.
4.2.3 LSE and SCA
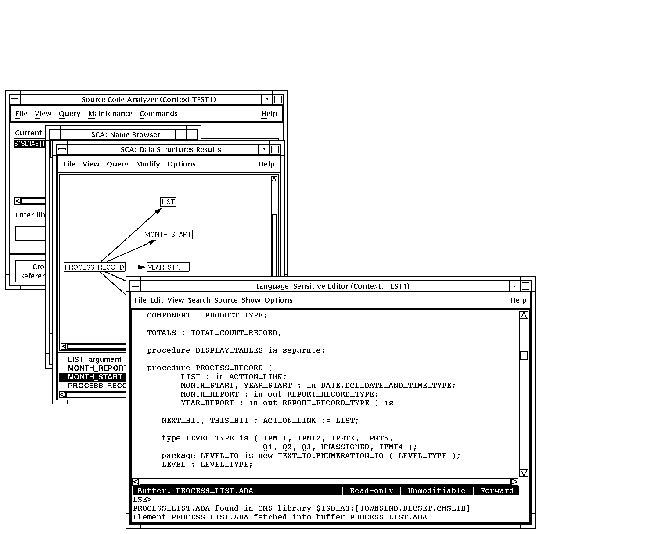
Using LSE and SCA together creates an integrated editing environment. You can browse through all of your code to look for specific declarations of symbols or other information without regard to file location. This integration is illustrated below in an example which continues on from Figure 4-3.
A CMS element has been fetched into an LSE buffer. Now we have a source file, and assuming that analysis data for the source files have been placed into the current SCA library, SCA FIND commands can be used to access other parts of the program:
Figure 4-4 LSE & SCA: Goto Declaration in Same File
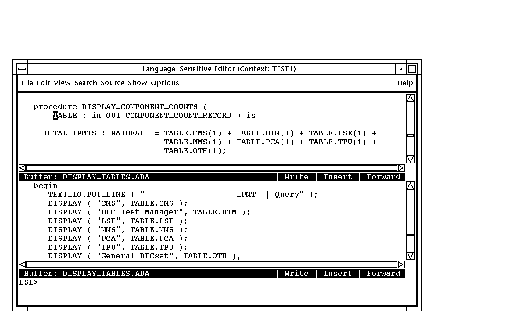
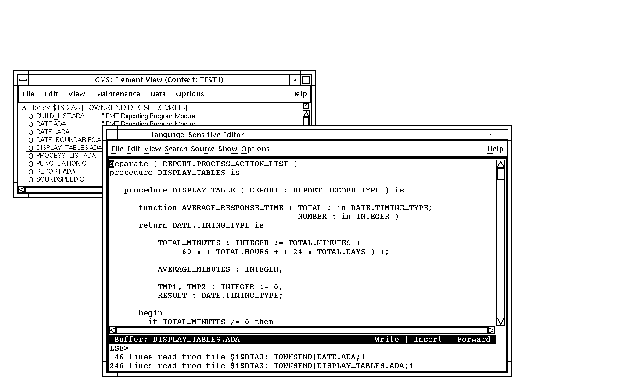
Figure 4-5 LSE & CMS: Goto Declaration in a CMS Element
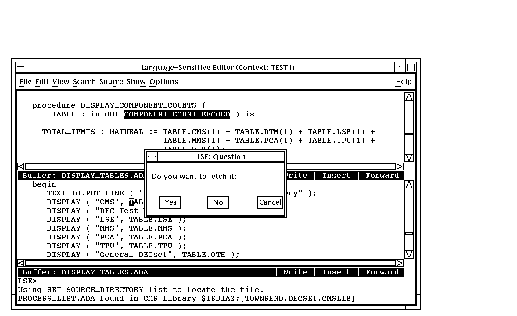
Figure 4-6 LSE & CMS: Element Fetched into an LSE Buffer
If SCA and LSE are running simultaneously in separate windows, LSE can display the source code associated with symbols displayed by SCA. This is illustrated by the example below:
Figure 4-7 SCA & LSE: From Data Structures Results to LSE Buffer
The combination of LSE and SCA also provides the report generation
capability of the program design facility. LSE generates and formats
the report based on design information provided by SCA.
4.2.4 MMS
MMS can access elements in CMS libraries during builds (see Section 3.3.2.3). All the files used for the build, product documentation, and the MMS description file can be kept in a CMS library. An MMS description file can also build from CMS classes. Additionally, MMS can access records stored in the Oracle Common Data Dictionary (CDD/Plus) or forms stored in libraries for the Forms Management System for OpenVMS (FMS).
MMS provides support for SCA. Analysis data can be generated automatically as part of the MMS build procedure and then stored in an SCA library.
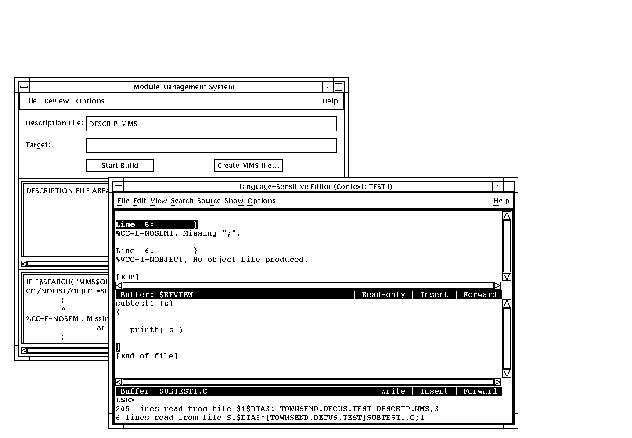
The MMS DECwindows Motif interface is also integrated with LSE, as the example below shows:
Figure 4-8 MMS & LSE: MMS Description File in LSE
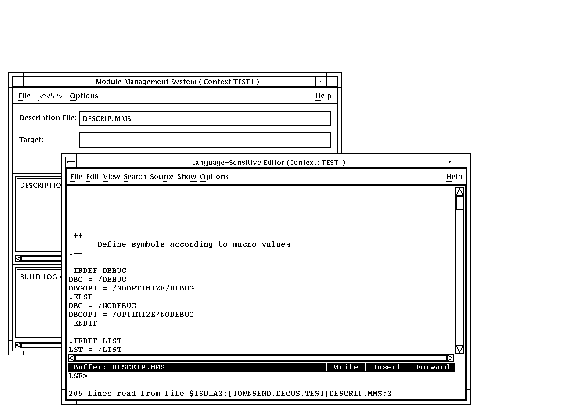
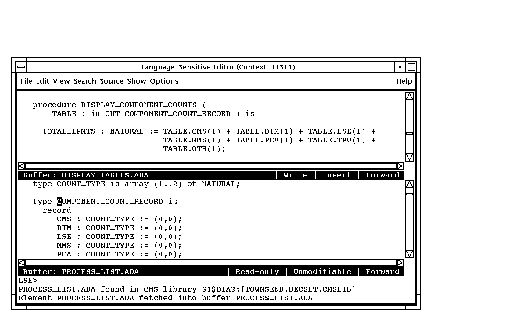
Figure 4-9 MMS & LSE: Compilation Errors During an MMS Build
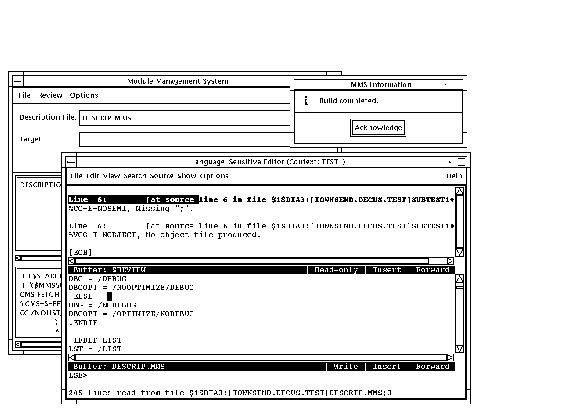
Figure 4-10 MMS & LSE: Correcting Compilation Errors
You can use the storage and update capabilities of CMS to manage the DTM template, benchmark, test data, prologue, and epilogue files. This is how the libraries were set up in Chapter 2. This feature can be useful in testing multiple versions of a software system in situations where the expected results change from version to version. For example, you can run previous versions of tests and compare their results against the results that were valid for the corresponding maintenance version of a system.
By using DTM with PCA, you can measure the performance or coverage of tests run under DTM. Using an MMS description file to build the application, you can also run those tests automatically.
| Previous | Next | Contents |