HP DECset for OpenVMS
HP DECset for OpenVMS
Cookbook for an Integrated Project Development
Environment
January 2005
This document is a collection of articles written by various
individuals in the DECset Engineering group. It describes some of the
main features of the DECset software and how the individual tools
can be used to form an integrated development environment.
Revision/Update Information:
This is a revised document.
Software Version:
DECset Version 12.6 for OpenVMS
Hewlett-Packard Company
Palo Alto, California
© Copyright 2005 Hewlett-Packard Development Company, L.P.
Confidential computer software. Valid license from HP required for
possession, use or copying. Consistent with FAR 12.211 and 12.212,
Commercial Computer Software, Computer Software Documentation, and
Technical Data for Commercial Items are licensed to the U.S. Government
under vendor's standard commercial license.
The information contained herein is subject to change without notice.
The only warranties for HP products and services are set forth in the
express warranty statements accompanying such products and services.
Nothing herein should be construed as constituting an additional
warranty. HP shall not be liable for technical or editorial errors or
omissions contained herein.
Intel and Itanium are trademarks or registered trademarks of Intel
Corporation or its subsidiaries in the United States and other
countries.
Java is a US trademark of Sun Microsystems, Inc.
Microsoft, Windows, and Windows NT are U.S. registered trademarks of
Microsoft Corporation.
Printed in the US
This document was prepared using VAX DOCUMENT, Version V3.2n.
Chapter 1
Introduction
The DECset for OpenVMS (DECset) software set consists of the following
core components:
- Code Management System for OpenVMS (CMS)
- Language-Sensitive Editor for OpenVMS (LSE)
- Source Code Analyzer for OpenVMS (SCA)
- Module Management System for OpenVMS (MMS)
- Digital Test Manager for OpenVMS (DTM)
- Performance and Coverage Analyzer for OpenVMS (PCA)
In addition to these components, DECset also includes the
DECset Environment Manager for OpenVMS, which is a tool that provides a single mechanism for
tailoring the execution environment across the DECset tools.
To provide support for the Windows programming environment, client
applications are also available for CMS and MMS. The HP DECset Clients for CMS and MMS
enable PC desktop access to CMS libraries as well as frequently-used
MMS and CMS commands. The DECset Clients provide convenient access to CMS
and MMS features through the Windows interface, the API, or through
Microsoft Visual Studio.
1.1 Main DECset Tools
The DECset tools run on the HP OpenVMS operating system and have
both a Digital Command Language (DCL) command-line interface and a
DECwindows Motif graphical interface.
LSE/SCA, CMS, and DTM also provide an application programming interface
(API) with a library of routines that can be called from the majority
of programming languages supported by OpenVMS.
1.1.1 CMS
CMS is a code management tool that provides an efficient way
to store files and track all changes to those files.
CMS can be use to archive any file type supported by OpenVMS Record
Management Services (RMS). CMS tracks changes to the archived files and
stores only the successive change data in ASCII text files. This not
only reduces the amount of disk space used for storing multiple
versions of files, but also allows CMS to reconstruct any previous
version and to identify the changes made between any two versions. In
addition to storing change data, CMS also maintains historical records
detailing file operations and library access.
Detailed information on CMS can be found in:
- HP DECset for OpenVMS Software Product Description
- Code Management System for OpenVMS Release Notes (SYS$HELP:CMS*.RELEASE_NOTES)
- CMS DECwindows Motif and DCL command-line online help
- Guide to DIGITAL Code Management System for OpenVMS Systems
- DIGITAL Code Management System Reference Manual
- DIGITAL Code Management System Callable Routines Reference Manual
1.1.2 LSE
LSE is a text editor built on top of the DEC Text Processing Utility
(DECTPU). It contains built-in knowledge of a variety of programming
languages supported by the OpenVMS operating system. LSE enables
application developers to extend and customize their DECTPU editing
environment to match specific programming and style preferences. From
within LSE, developers can edit, compile, and debug applications as
well as create low-level program designs (by embedding pseudocode in
source code). They can also create different views of the source code,
at various levels of detail, by replacing a sequence of source lines
with a single overview line.
Detailed information on LSE can be found in:
- HP DECset for OpenVMS Software Product Description
- Language-Sensitive Editor for OpenVMS Release Notes (SYS$HELP:LSE*.RELEASE_NOTES)
- LSE (and SCA) DECwindows Motif and DCL command-line online help.
LSE has both Portable and VMSLSE command language help.
- Guide to DIGITAL Language-Sensitive Editor for OpenVMS Systems
- DIGITAL Language-Sensitive Editor/Source Code Analyzer for OpenVMS Reference Manual
- DIGITAL Language-Sensitive Editor Command-Line Interface and Callable Routines Manual
1.1.3 SCA
SCA is an interactive cross-reference and static source code analysis
tool that works with a variety of languages supported by the OpenVMS
operating system. In addition to syntax and reference checking, it also
provides navigation capabilities that help developers check the
consistency of their source code as well as find and view specific code
components.
Detailed information on SCA can be found in:
- HP DECset for OpenVMS Software Product Description
- Source Code Analyzer for OpenVMS Release Notes (SYS$HELP:SCA*.RELEASE_NOTES)
- SCA (and LSE) DECwindows Motif and DCL command-line online help.
Like LSE, SCA also has both portable and VMSLSE versions of its help
files.
- Guide to DIGITAL Source Code Analyzer for OpenVMS Systems
- DIGITAL Language-Sensitive Editor/Source Code Analyzer for OpenVMS Reference Manual
- DIGITAL Source Code Analyzer Command-Line Interface and Callable Routines Manual
1.1.4 MMS
MMS automates and simplifies the building of applications in the
OpenVMS environment. It rebuilds only those components (and their
dependencies) that have changed since an application was last built,
which helps to optimize the build process. MMS can also generate
description files for supported languages automatically (see
Chapter 3).
Detailed information on MMS can be found in:
- HP DECset for OpenVMS Software Product Description
- Module Management System for OpenVMS Release Notes (SYS$HELP:MMS*.RELEASE_NOTES)
- MMS DECwindows Motif and DCL command-line online help
- Guide to DIGITAL Module Management System for OpenVMS Systems
1.1.5 DTM
DTM organizes and automates the software regression testing process. It
is used to run, review, and store software regression tests and test
results. Two types of testing are currently supported:
- Non-interactive, terminal-oriented or workstation testing, based
upon command scripts and output capturing
- Interactive, terminal-oriented or DECwindows Motif record-and-play
testing
Detailed information on the DTM can be found in:
- HP DECset for OpenVMS Software Product Description
- Digital Test Manager for OpenVMS Release Notes (SYS$HELP:DTM*.RELEASE_NOTES)
- DTM DECwindows Motif and DCL command-line online help
- Guide to DIGITAL Test Manager for OpenVMS Systems
- DIGITAL Test Manager for OpenVMS Reference Manual
1.1.6 PCA
PCA helps analyze the performance of software applications. It can
measure where an application spends its time, causes page faulting, and
performs I/O operations.
PCA consists of two components: the Collector and the Analyzer. The
Collector gathers performance and coverage data from a running
application and writes that data to a performance data file. The
Analyzer then processes and displays the data graphically in the form
of histograms and tables.
Detailed information on PCA can be found in:
- HP DECset for OpenVMS Software Product Description
- Performance and Coverage Analyzer OpenVMS Release Notes (SYS$HELP:PCA*.RELEASE_NOTES)
- Guide to DIGITAL Performance and Coverage Analyzer for OpenVMS Systems
- PCA DECwindows Motif and DCL command-line online help
- DIGITAL Performance and Coverage Analyzer for OpenVMS Reference Manual
- DIGITAL Performance and Coverage Analyzer Command-Line Interface Guide
Chapter 2
The Environment Manager
The DECset Environment Manager for OpenVMS (Environment Manager) provides a common interface for
defining the execution environment for all the DECset tools displaying
on a particular DECwindows Motif display device.
The DECwindows Motif interface is provided by the Environment Manager. The
command-line interface is provided by DCL DECset commands. Both of
these interfaces are described in the Using DECset for OpenVMS Systems. Another good source
of information is the online help for DECset and the Environment Manager.
Each tailored execution environment is known as a
context, which consists of a named set of values that
customize the DECset tools for a specific activity. The data for each
context is stored in a separate ASCII text file. A listing of related
contexts is also available in ASCII format, which is known as the
context database.
Context definitions can be nested, that is, one context can be based
upon another context. The base context is known as the
parent, and the new context is known as the
child. A child context inherits all information from
its parent.
The rest of this chapter describes how to:
- Access the Environment Manager
- Setup a context database
- Define a series of contexts
- Determine what may be set by a context
- Setup context inheritance
2.1 Accessing the Environment Manager
You can access the Environment Manager from one of the following:
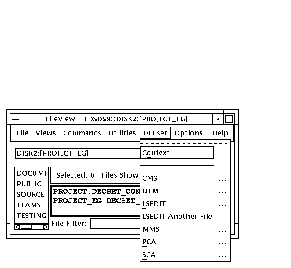
- DECset tool selection or context management pull-down menus
available from the DECwindows Motif Session Manager or FileView windows
(see Figure 2-1)
- DECwindows Motif interface to a DECset application
Figure 2-1 DECset Tools Selection Pull-down menu
Depending on how the Environment Manager is invoked, it is displayed either as
an icon or in its expanded form (see Figure 2-2).
Figure 2-2 Environment Manager Context Window and Icon
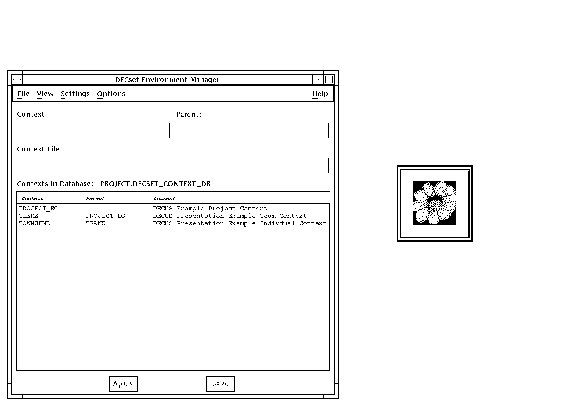
From this initial screen you can set up context databases and create
and edit contexts. A context allows you to define settings for the
default directory, CMS libraries, DTM library, logical names, MMS
options, SCA libraries, source directories, and symbols.
Note
Be careful when changing the default directory setting. This setting
affects the default directory setting for all DECset components. Once
this value is defined or changed in the context, it replaces the user's
current default directory setting.
|
2.2 Setting Up a Project Context Database and Contexts
There are a number of steps involved in setting up a project context:
- Project definition and initial set up.
- Context database creation.
- Project context creation.
- Team context creation.
- Individual context creation.
- Applying and using a context.
2.2.1 Project Definition and Initial Setup
Some initial groundwork is required before creating project contexts.
You need to first specify how the project directories and files are to
be organized, how the DECset tools are to look and behave, and what
definitions and symbols need to be available.
Most of this information is project- or company-specific, but for the
purposes of these examples, the project is broken down by teams. Each
team defines their directory and library structure; and the team
members tailor their own contexts.
Figure 2-3 illustrates the sample directory and library structures
used in this chapter.
Figure 2-3 Sample Project Directory Structure
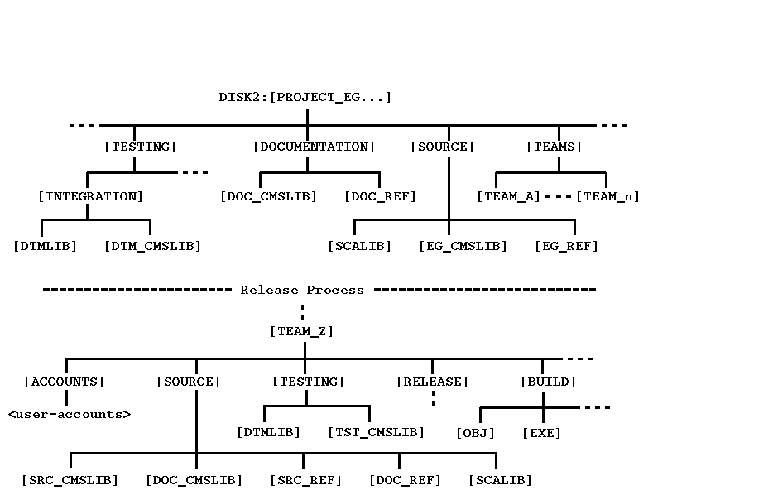
In this sample:
- The entire project resides on one disk (DISK2).
- All project files reside under the main project directory
(PROJECT_EG).
- The team directories and libraries reside under a team directory
(TEAMS).
- All the Digital Test Manager libraries use CMS libraries.
- All the non-Digital Test Manager CMS libraries have reference
directories.
- There is also an undefined release process to handle the transfer
of files from a team to the project. Otherwise, each team is
responsible for its own code management.
The examples in this chapter show the setting up of three contexts:
- Project context (PROJECT_EG)
- Team context (TEAM_Z)
- User context (TOWNSEND)
In reality, many other contexts may also be required: contexts for QA,
source code librarians, project managers, documentation, release
testing, and so on.
Once the project structure has been defined, the next step is to create
all the directories and libraries. Figure 2-4 and Figure 2-5 show
the creation of SCA and CMS libraries for PROJECT_EG and a test library
for TEAM_Z. Subsequent examples assume that all the directories and
libraries have been created previously.
Figure 2-4 Creating an SCA and a CMS Library
$ CREATE/DIRECTORY DISK2:[PROJECT_EG.SOURCE.SCALIB]
$ SCA CREATE LIBRARY DISK2:[PROJECT_EG.SOURCE.SCALIB]
%SCA-S-NEWLIB, SCA Library created in DISK2:[PROJECT_EG.SOURCE.SCALIB]
$ CREATE/DIRECTORY DISK2:[PROJECT_EG.SOURCE.EG_CMSLIB]  ! library
$ CREATE/DIRECTORY DISK2:[PROJECT_EG.SOURCE.EG_REF]     ! reference directory
$ SET DEFAULT DISK2:[PROJECT_EG.SOURCE]
$ CMS CREATE LIBRARY [.EG_CMSLIB] /REFERENCE_COPY=[.EG_REF]
_Remark: PROJECT_EG CMS Library
%CMS-S-CREATED, CMS Library DISK2:[PROJECT_EG.SOURCE.EG_CMSLIB] created
|
Figure 2-5 Creating a Test Library
$ CREATE/DIRECTORY DISK2:[PROJECT_EG.TEAMS.TEAM_Z.TESTING.DTMLIB]
$ CREATE/DIRECTORY DISK2:[PROJECT_EG.TEAMS.TEAM_Z.TESTING.TST_CMSLIB]
$ SET DEFAULT DISK2:[PROJECT_EG.TEAMS.TEAM_Z.TESTING]
$ CMS CREATE LIBRARY [.TST_CMSLIB] "Testing CMS Library"
%CMS-S-CREATED, CMS Library ...TST_CMSLIB] created
$ DTM
DTM> CREATE LIBRARY [.DTMLIB] "Test DTM Library"
%DTM-S-CREATED, Digital Test Manager library ...DTMLIB] created
DTM> SET TEMPLATE_DIRECTORY CMS$LIB ""
%DTM-S-NEWDEF, ...TST_CMSLIB] is the new default collection template directory
DTM> SET BENCHMARK_DIRECTORY CMS$LIB ""
%DTM-S-NEWDEF, ...TST_CMSLIB] is the new default collection benchmark directory
DTM> EXIT
|
2.2.2 Context Database Creation
After the creation of the directories and libraries, the next step is
to create the project context database. This can be achieved by using
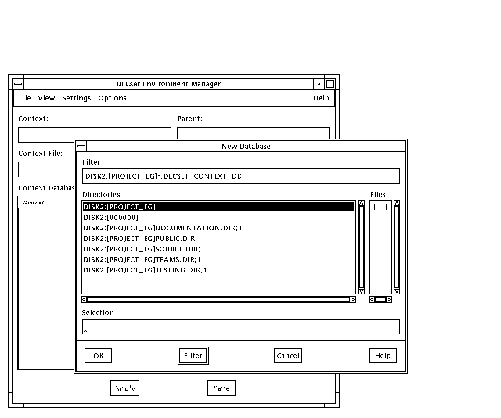
the Environment Manager, as follows:
- Select New Database... from the File pull-down menu.
- Enter the appropriate information (see Figure 2-6).
- Click the OK button.
Although the database is selected, the database file is not created
until the first context is defined and saved.
Figure 2-6 Environment Manager New Database Dialog Box
2.2.3 Project Context Creation
A project context can be created from with the Environment Manager, as follows:
- Select New Context... from the File pull-down menu.
- Enter the appropriate information (see Figure 2-7).
- Click the OK button and the context is created.
Figure 2-7 Environment Manager New Context Dialog Box
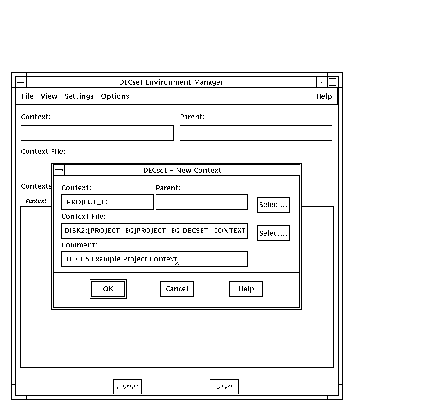
All the examples throughout this chapter use the logical name DISK2
to define the disk. However, as the Environment Manager expands all the
logical names used in directory specifications, in many of the
examples, the translation of the logical for DISK2 ($1$DIA3) is
displayed.
- Define the context settings. As this process is both
straight-forward and described in some detail in the Environment Manager's
documentation, examples are limited to the definition of a few logical
names (see Figure 2-8) and a test library (see Figure 2-9).
Figure 2-8 Defining Logical Names for a Context
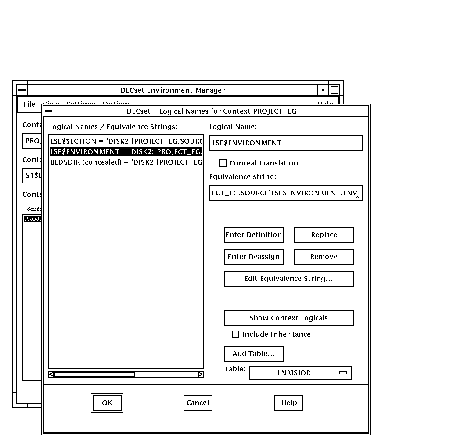
Figure 2-9 Defining a Test Library for a Context
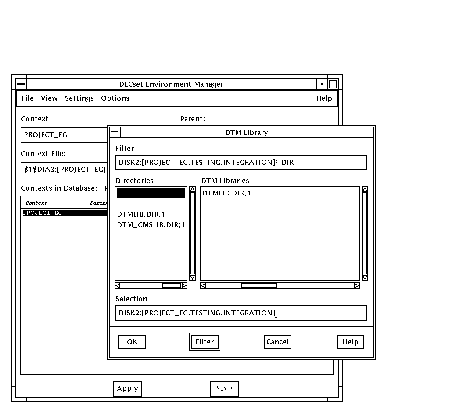
Figure 2-10 contains extracts from a defined project context file.
Figure 2-10 Sample Context File for PROJECT_EG
!
! Context file $1$DIA3:[PROJECT_EG]PROJECT_EG.DECSET_CONTEXT
! Written by DECset Environment Manager at 31-OCT-1995 14:17:37.03
! Do not edit this file
!

DEFINE/TABLE=LNM$PROCESS DTM$LIB -
 DISK2:[PROJECT_EG.TESTING.INTEGRATION.DTMLIB]
DEFINE/TABLE=LNM$PROCESS CMS$LIB -
 DISK2:[PROJECT_EG.SOURCE.EG_CMSLIB],DISK2:[PROJECT_EG.DOCUMENTATION.DOC_CMSLIB]
DEFINE/TABLE=LNM$PROCESS SCA$LIBRARY -
 DISK2:[PROJECT_EG.SOURCE.SCALIB]
          :
SET_DIRECTORY SOURCE -
 DISK2:[PROJECT_EG.SOURCE]

CMS SET LIBRARY -
 DISK2:[PROJECT_EG.SOURCE.EG_CMSLIB], -
 DISK2:[PROJECT_EG.DOCUMENTATION.DOC_CMSLIB]

SCA SET LIBRARY -
 DISK2:[PROJECT_EG.SOURCE.SCALIB]

DTM SET LIBRARY DISK2:[PROJECT_EG.TESTING.INTEGRATION.DTMLIB]

SET_MMS RULES
    :
SET_MMS NOLOG
|
Although a comment within each file recommends not editing the content,
since a context file is an ASCII text file, it can be edited to remove
or add context information. For example, you might find it quicker to
add numerous symbols manually instead of using the symbol definition
screen. The online help describes the format of a context file and is
available by entering the following command:
$ HELP DECSET CONTEXT_FILE
|
2.2.4 Team Context Creation
Team contexts (for example, TEAM_Z) are created as child contexts of
the main project context (PROJECT_EG).
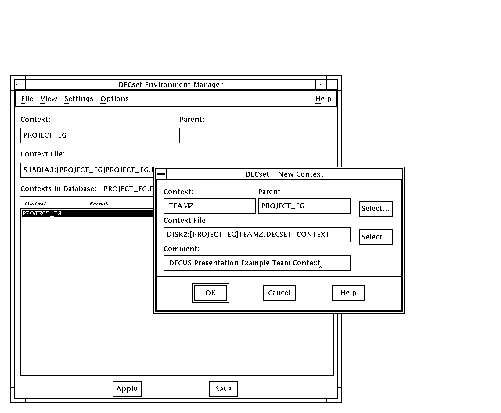
The steps to create a team context are the same as those for the
project context (see Section 2.2.3), except that the project context is
specified as a parent (see Figure 2-11).
Figure 2-11 Environment Manager New Context Dialog Box
As with the project context, once the team context has been created,
the next stage is to define the settings. The following steps show how
a linker options file (for MMS builds) can be defined:
- Select MMS Options from the Settings pull-down menu, then select
Linker Options. This brings up the MMS Linker Options Files dialog box.
- Click the Select... button and specify the options file (see
Figure 2-12).
- Click the OK button to return to the MMS Linker Options Files
dialog box.
- Click the Append button to add the options into the list.
- Click the OK button to set the options file.
Figure 2-12 Environment Manager Select Option File Dialog
Box
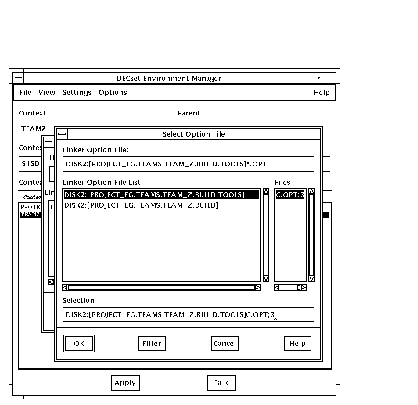
Figure 2-13 contains extracts from the TEAM_Z context file after the
libraries and source directories, an MMS rules file, a default
description file, a linker options file, and some symbols have been set.
Figure 2-13 Sample Context File for TEAM_Z
!
! Context file $1$DIA3:[PROJECT_EG]TEAMZ.DECSET_CONTEXT
! Written by DECset Environment Manager at 31-OCT-1995 17:11:59.71
! Do not edit this file
!

DEFINE/TABLE=LNM$PROCESS SCA$LIBRARY -
 DISK2:[PROJECT_EG.TEAMS.TEAM_Z.SOURCE.SCALIB]
DEFINE/TABLE=LNM$PROCESS DTM$LIB -
 DISK2:[PROJECT_EG.TEAMS.TEAM_Z.TESTING.DTMLIB]
             :
DEFINE/TABLE=LNM$PROCESS CMS$LIB -
 DISK2:[PROJECT_EG.TEAMS.TEAM_Z.SOURCE.SRC_CMSLIB], -
 DISK2:[PROJECT_EG.TEAMS.TEAM_Z.SOURCE.DOC_CMSLIB]

LEADER == "EDSDS1::SMITH"
     :
QA == "EDSDS1::JONES"

SET_DIRECTORY SOURCE -
 DISK2:[PROJECT_EG.TEAMS.TEAM_Z.SOURCE]

CMS SET LIBRARY -
 DISK2:[PROJECT_EG.TEAMS.TEAM_Z.SOURCE.SRC_CMSLIB], -
 DISK2:[PROJECT_EG.TEAMS.TEAM_Z.SOURCE.DOC_CMSLIB]

SCA SET LIBRARY -
 DISK2:[PROJECT_EG.TEAMS.TEAM_Z.SOURCE.SCALIB]

DTM SET LIBRARY DISK2:[PROJECT_EG.TEAMS.TEAM_Z.TESTING.DTMLIB]

SET_MMS RULES=DISK2:[PROJECT_EG.TEAMS.TEAM_Z.BUILD.TOOLS]RULES.MMS

SET_MMS DESCRIPTION=( -
 DISK2:[PROJECT_EG.TEAMS.TEAM_Z.BUILD.TOOLS]DESCRIP.MMS)

SET_MMS SCA_LIBRARY

SET_LINKER OPTIONS_FILE -
 DISK2:[PROJECT_EG.TEAMS.TEAM_Z.BUILD.TOOLS]C.OPT

SET_MMS NOOVERRIDE

SET_MMS CMS
  :
SET_MMS NOLOG
|
2.2.5 Personal Context Creation
A personal or user context (for example, TOWNSEND) is created as a
child of the team context. The steps to create it are identical to
those for TEAM_Z (see Section 2.2.4), except TEAM_Z is specified as the
parent.
Since the steps in the previous examples are similar, sample screens
showing the tailoring process for a personal context have not been
provided. However, for the purposes of this example, the following
definitions are assumed:
- Redefinition of the LSE environment and section files to pick up
the local customizations.
- Definition of a local SCA library in a search list with the team's
library.
- MMS definitions to build from the source directories, rather than
CMS, by default, and specification for compilation settings (Diagnostic
and Debug flags).
You can show how a context (combined with its parent contexts) will
tailor an environment by selecting View Context Including Inheritance
from the View pull-down menu in the Environment Manager.
The equivalent DCL command is DECSET SHOW CONTEXT. Figure 2-14
contains extracts from this command for the TOWNSEND context.
Figure 2-14 DECSET SHOW CONTEXT Command Example
$ DECSET SHOW CONTEXT

Context TOWNSEND
--------------------------------------------------
Context description: DECUS Presentation Example Individual Context
Name of parent context: TEAMZ
Database file spec: $1$DIA3:[PROJECT_EG]PROJECT.DECSET_CONTEXT_DB
Context file spec: $1$DIA3:[PROJECT_EG.TEAMS.TEAM_Z.USERS.TM1]PT1.DECSET_CONTEXT;
No default directory was specified.

Logical Name Definitions + Deassignments (by table):
    Logical Name Table: LNM$PROCESS
      Definitions:
        DTM$LIB =
            DISK2:[PROJECT_EG.TEAMS.TEAM_Z.TESTING.DTMLIB]
        CMS$LIB =
            DISK2:[PROJECT_EG.TEAMS.TEAM_Z.SOURCE.SRC_CMSLIB]
            DISK2:[PROJECT_EG.TEAMS.TEAM_Z.SOURCE.DOC_CMSLIB]
        SCA$LIBRARY =
            DISK2:[PROJECT_EG.TEAMS.TEAM_Z.USERS.TM1.WORK.SCALIB]
            DISK2:[PROJECT_EG.TEAMS.TEAM_Z.SOURCE.SCALIB]
        LSE$SOURCE =
            DISK2:[PROJECT_EG.TEAMS.TEAM_Z.SOURCE]
        DOC$ =
            DISK2:[PROJECT_EG.DOCUMENTATION.DOC_REF]
        SRC$ =
            DISK2:[PROJECT_EG.TEAMS.TEAM_Z.SOURCES]
        TOOLS$ =
            DISK2:[PROJECT_EG.TEAMS.TEAM_Z.BUILD.TOOLS]
      Deassignments:
    Logical Name Table: LNM$JOB
      Definitions:
        LSE$SECTION =
            DISK2:[PROJECT_EG.SOURCE]LSE$SECTION.TPU$SECTION
        LSE$ENVIRONMENT =
            DISK2:[PROJECT_EG.SOURCE]LSE$ENVIRONMENT.ENV
      Deassignments:

Symbol definitions:
       :
Symbol deletions:

MMS macro definitions:

Source directories:
    DISK2:[PROJECT_EG.TEAMS.TEAM_Z.SOURCE]

CMS libraries:
    DISK2:[PROJECT_EG.TEAMS.TEAM_Z.SOURCE.SRC_CMSLIB]
    DISK2:[PROJECT_EG.TEAMS.TEAM_Z.SOURCE.DOC_CMSLIB]

SCA libraries:
    DISK2:[PROJECT_EG.TEAMS.TEAM_Z.USERS.TM1.WORK.SCALIB]
    DISK2:[PROJECT_EG.TEAMS.TEAM_Z.SOURCE.SCALIB]

DTM libraries:
    DISK2:[PROJECT_EG.TEAMS.TEAM_Z.TESTING.DTMLIB]

MMS macro definition files:

MMS rules file:
    DISK2:[PROJECT_EG.TEAMS.TEAM_Z.BUILD.TOOLS]RULES.MMS

MMS description files:
    DISK2:[PROJECT_EG.TEAMS.TEAM_Z.BUILD.TOOLS]DESCRIP.MMS

MMS changed sources:

MMS SCA library to generate:
    :
Linker options files:
    DISK2:[PROJECT_EG.TEAMS.TEAM_Z.BUILD.TOOLS]C.OPT

MMS-related Flags:
Override macros: 0
    :
Enable DEBUG macro (MMS): 0
    :
[End of Listing]
|


